And I figured today would be a great time for the years first(and last) Technical Thursday :D As we prepared for the holidays, I saw a lot of random pictures and tutorials that I'll never see again, or be able to credit, but the one that stuck with me was a picture of someone making a pom pom with toilet paper rolls. A couple dozen of which I currently have stashed for future kid projects. So as I was finishing my father in law's present(did I mention I got married 2 months ago?) I grabbed my cell phone and started snapping pictures. Again, some day I will own my very own Canon Rebel camera and assorted lenses, but until then, we're stuck with what we've got available, lol.
So this is how I made the pom pom.
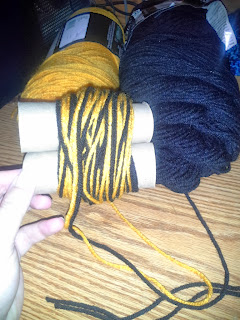
You need yarn, 2 toilet paper rolls, and scissors. Liquid stitch is optional, I just like to soak the center of my pom poms in hopes that they won't fall apart as easily as they normally do. It's just their nature to fall apart.
1. Cut 2 12-16" lengths of whatever color you want your ties to be.

2. Hold the tails of your yarn and begin winding around both tubes

3. Overlap on your tails a bit so you don't have keep your finger holding them down

4. Keep wrapping- the thicker the wrap, the fluffier the pompom.
5. Once you've reached your desired thickness, work one of your tail lengths of yarn UNDER all the wrapped yarn(I used a crochet hook)


6. Center the tail and TIE TIGHTLY. Then work the yarn underneath again and TIE IT AGAIN.

7. Flip it over, and repeat step 6.

8. Now slide the tubes most of the way out, and tie the two tails together. Gently remove the tubes and tie the centers together carefully and repeatedly. I tied them together, then wound the tails around again and tied twice more. Bulky knots will not be visible once you fluff, just take care to leave enough tail to attach to what you are working on.

9. Optional: Coat your center ties and knots with liquid stitch for durability.

10. Gently insert your scissors and begin cutting the loops. Take care to avoid cutting your tails, but do snip your working yarn off.

11. Repeat on the other side. Fluff and let dry.

12. Attach to your project and enjoy.

Before I saw the picture that sparked this idea, I was using a double wide DVD case and doing essentially the same thing. I find that the toilet paper tubes are a little more forgiving and easier to work with because I wasn't worried about scraping the cover ;)